

Overview
This guide will provide you everything you need to set up and start using your new SketchTank: Virtual Coloring Aquarium. We’ll take you through the simple steps of setting up the necessary hardware, configuring your SketchTank: Aquarium, and scanning your first coloring page.
Before you begin, make sure you have not only the kit provided to you by us, but a display (either a projector, monitor, or TV) to use as your Aquarium Display (which will show all the fish swimming in the ocean environment).
If at any time, you have questions about the setup or need assistance, don’t hesitate to contact us. We’ll be glad to help.
Hardware Setup
Hardware Provided by Workinman Interactive
Preconfigured MiniPC (with keyboard and mouse), Scanner, Monitor for scanner, and cabling to connect them.
Hardware NOT Included (customer must supply)
Aquarium display (Projector, Monitor, or TV), Cable to this display, and either a Desk, Cabinet, or Custom build for the scanning station.
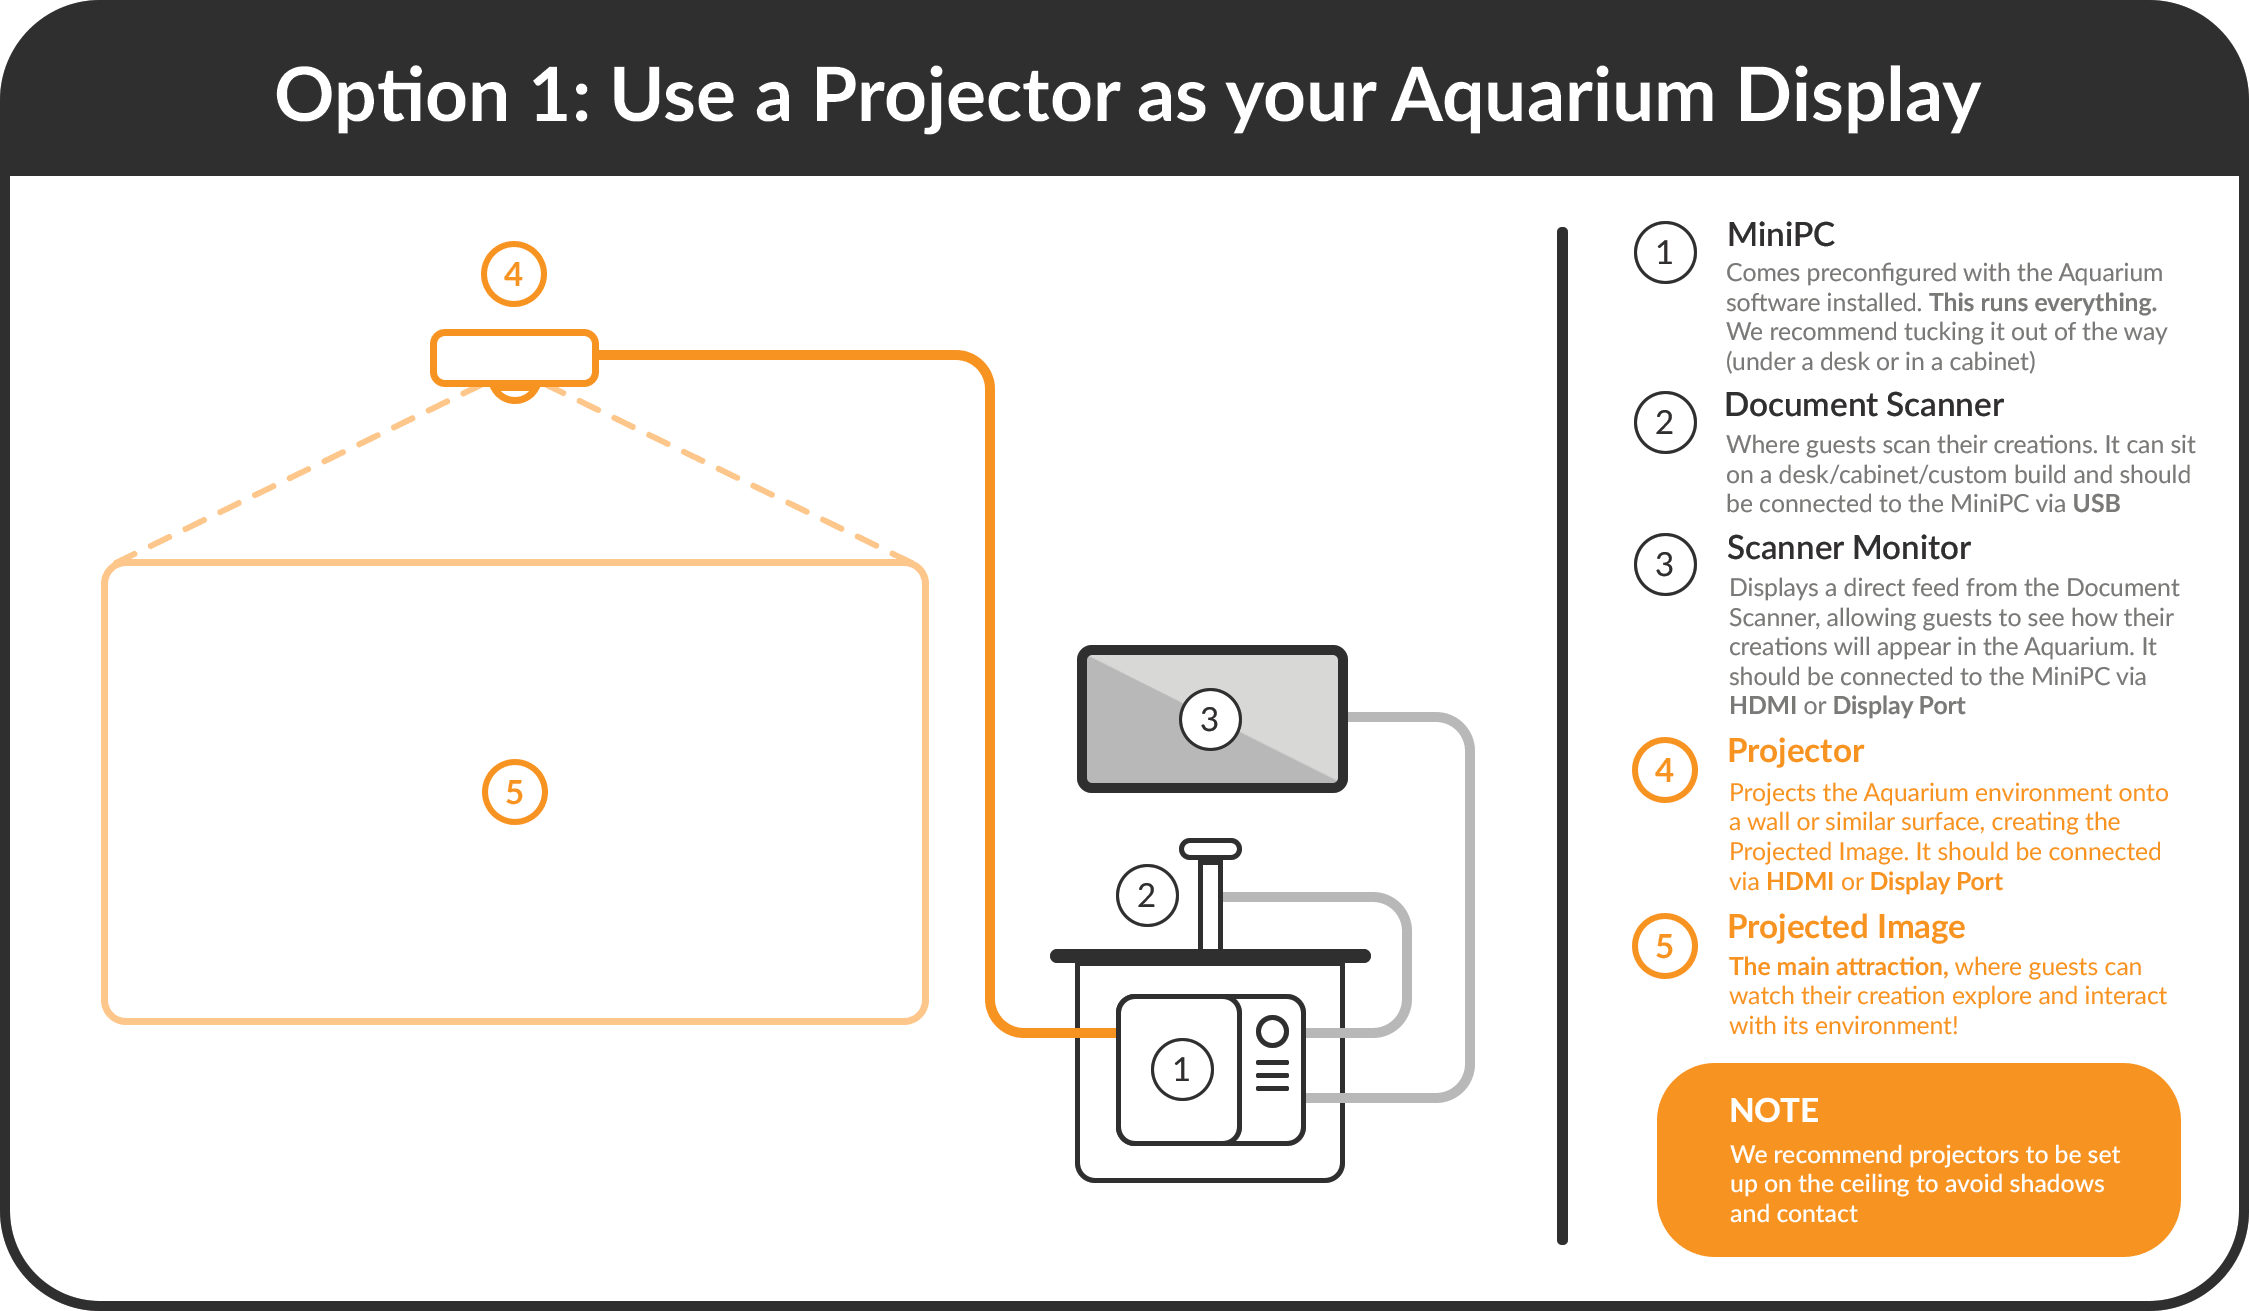

Connect Your MiniPC
Tip
Place the MiniPC (along with its keyboard & mouse) in a location that is only accessible to authorized users, ideally locked in a ventilated drawer. Only the Scanner and Monitor should be accessible to everyday users.
01
Connect the supplied Mouse and Keyboard to the MiniPC USB ports labeled “Mouse” and “Keyboard.”

02
Insert the MiniPC power cord into the power port at the back of the MiniPC.

03
Plug the power cord of the MiniPC into a nearby electrical outlet.

04
Power on the MiniPC by pressing the power button at the front of the MiniPC. It will boot to the Windows desktop.

Connect Your Scanner Display
Tip
The Scanner Display is a monitor (provided in this kit) that will show the guest’s artwork being scanned and then come to life before it swims off to the Aquarium Display. It connects to the MiniPC and is best positioned adjacent to the scanner so guests can see their artwork clearly while it’s scanned.
01
Connect the supplied HDMI cable from the HDMI port at the back of the Scanner Display (Monitor) to the HDMI port on the MiniPC labeled “Monitor.”

02
Insert the Scanner Display power cord into the power port at the back of the display.

03
Plug the power cord of the Scanner Display into a nearby electrical outlet.

04
If the Scanner Display does not power on automatically, power on the monitor by pressing the power button.

Connect Your Aquarium Display
Tip
The Aquarium Display (NOT provided in this kit) is either a Projector, TV, or additional Monitor that will display the aquarium scene with all the fish swimming around in it. While most of our clients use projectors, any display with an HDMI connection will work. If your Projector is not yet installed, you can easily set up and test the SketchTank: Virtual Coloring Aquarium with a TV or Monitor as your Aquarium Display and swap it for the Projector later.
01
Connect the HDMI display cable from the Aquarium Display/Projector to the HDMI port on the MiniPC labeled “Aquarium.”
NOTE: The HDMI display cable for your Aquarium display is not included in this kit. Be sure to acquire one that is long enough to extend from the display to the MiniPC, which would be located at the Scanning Station.

02
Power on the Aquarium Display/Projector if you have not done so already.

Connect Your Document Scanner
Tips
The Document Scanner will sit on a desk or cabinet along with the Scanner Monitor and connect directly to the MiniPC. The scanner is where kids will place their artwork, face up, to be scanned into the aquarium.
You can securely mount the scanner to avoid it being moved or knocked over with a set of 4 lag bolts.
Optionally, you may have chosen to have a custom Scanning Station cabinet built, or will build one yourself. In this case, you can disregard this section. Custom cabinets will use a modular camera and not need a Document Scanner.
01
Connect the supplied USB cable to the USB port on the Document Scanner.

02
Connect the two USB connectors on the other end of the USB cable to the MiniPC USB ports labeled “Scanner”.

03
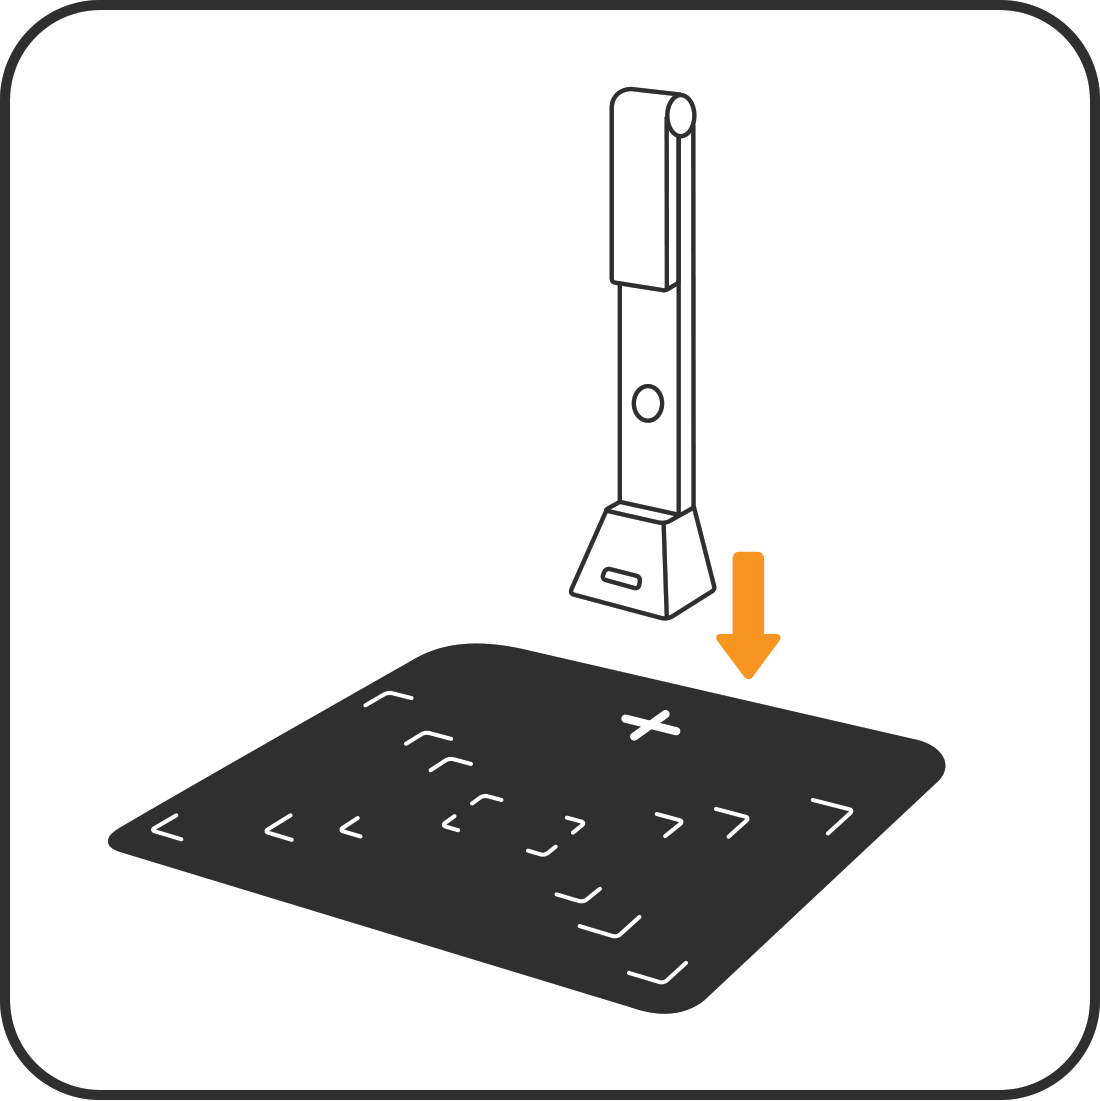
Place the Document Scanner onto the scan mat so the Scanner is covering the [ + ] mark.
NOTE: You could also permanently mount the scanner to prevent incidental movement. the Scan Mat is not necessary for the scanner and SketchTank to work, but it does help guests align their artwork for scanning. Some of our clients paint the surface of the table or create their own designs for a scanning mat. If you decide to make it custom, make it minimally-reflective for best results.
04
Unfold the Document Scanner so that the camera is facing towards the scan mat.
NOTE: The capacitive button on the top of the scanner turns the light of the scanner on/off. This light may improve scanning clarity in a very dark environment.

Launching the SketchTank Software
01
On Windows Desktop, double-click the SketchTank icon to launch the experience.

Configuring Your SketchTank: Virtual Coloring Aquarium
When you first launch the experience, the First Time Setup instructions will guide you through some calibration steps.
- Ensure you are using a blank sheet of white paper for calibration, ideally the same type of paper you will use to print your fish coloring pages on.
- Ensure your environment lighting conditions are set to what they will be during normal hours of operation.
- You can replay the First Time Setup at any time within the Configuration Menu (press [ENTER] on the keyboard when the app is running in order to access the menu).
Print Your Coloring Pages
Coloring pages are provided in PDF format and you can print as many as you need. You will find a copy of them in the Documents Folder of the MiniPC. You can also download pdfs of all species, the reef environment species, and the shark environment species.
Load them up in Adobe Acrobat Reader or in a web browser to print them.
For best results…
- Print to standard 8.5 x 11in copy paper. A4 paper will also work.
- Use “scale to fit page” setting when printing (if available)
- Laser printers tend to work better and faster, but inject will work as well
- Make sure the printer prints the black lines evenly
Try Your New Aquarium
01
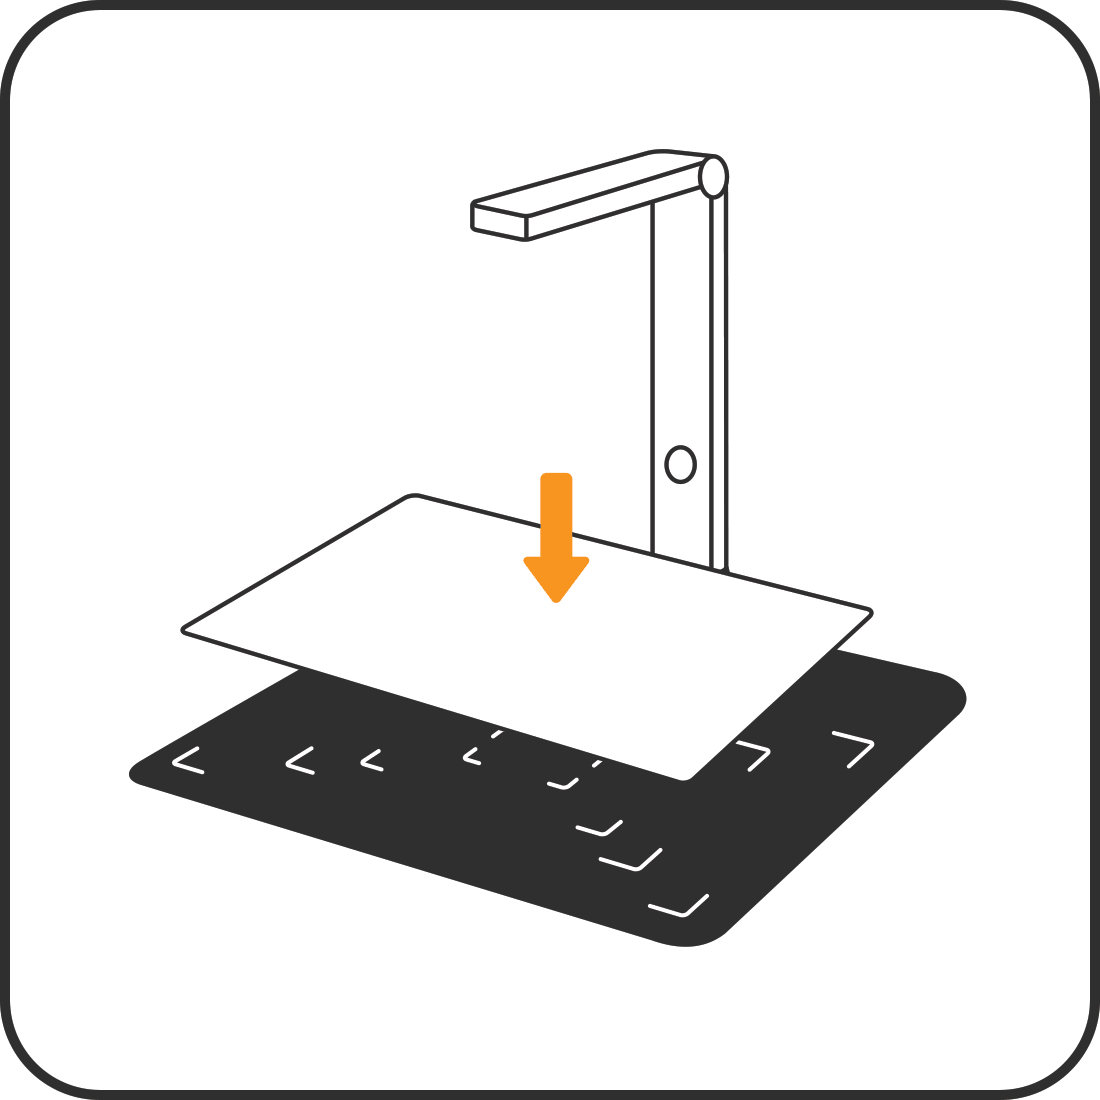
Place a coloring page face-up on the scan mat and align it to the position mark. Once the coloring page is detected, scanning will begin automatically. Your fish will come to life on the monitor and then swim out to the Aquarium Display.
Configuration Menu
The Configuration Menu can be accessed by pressing the [Enter] key on the keyboard while the experience is running. Any changes within this menu will be automatically saved and kept until you change them.
- Clear Aquarium – To remove all fish from the aquarium, press the [Backspace] key on the keyboard.
- Quit Application – To exit the application, press and hold the [Esc] key on the keyboard for 2 seconds.
- Toggle Screen Layout – Toggles which display the aquarium/scanner screens are shown.
- Scanner Pipe Y Position – Toggles which side of the scanning station the pipe is located.
- Aquarium Pipe Y Position – Toggles which side of the aquarium the pipe is located. Use this to match the pipe position on the Scanning Station’s monitor with the pipe in the Aquarium Display.
- Scan Saturation – Adjusts the saturation of the scanned coloring page.
- Reset – Resets all settings to their default configuration. You must restart the app for this to take effect.
- Replay First Time Setup – Allows you to calibrate the scanner white balance to your environment lighting conditions.
Helpful Hotkeys
You can press the following hotkeys on the keyboard to make on-the-fly adjustments to the SketchTank Aquarium
- [Enter] – Open config menu
- [Backspace] – Delete all the fish in the aquarium
- [Escape] (Hold for 2 seconds) – Quit the app
- Hold [Delete] and press [Space] – Resets all saved settings to defaults (Must restart the app to take effect)
Have Any Questions?
Check out Frequently Asked Questions for more help.
Contact our team for support or to show off your new SketchTank in action.
